Sunday 28 December 2014

The Fairfield: Wallpapering III

27/12: I started wallpapering the lounge room with the red damask paper, and I got the three main walls done without too much difficulty.


I also wallpapered one wall of the bedroom today; the French door wall.

I then glued together the bay window so that I can wallpaper it next, and do the window trim before I glue it to the main house.

I also took the plugs off the chandelier in the foyer and fitted it, as well as one of the single wall-mounted lights in the hallway. The chandelier has a different, larger, fitting than the hall light, and when I checked, only the smaller fitting will go into the 1:24 scale electrical fitting I have. I have a few spare plugs, so I hope I can change it over.

28/12: Today I wallpapered the bay window and then glued the window trim on the inside of the window. It needs some wood filler as one of the corners didn't meet up exactly, but I'm not sure what to do there since it is stained. Maybe fill, sand and paint the filler black?  It is the top right corner, so you can it from the outside, but it isn't overly bad.


I then wallpapered the second wall in the bedroom - the fireplace wall. I can't do the back wall until I am sure that the hall light works, as I will be papering over the wire. Unfortunately, the bi-pin bulb for the light is TINY and I am having trouble getting it into the fitting without throwing a wobbly, lol. So that's on hold for the moment.


I also printed and trimmed the picture of a map of Middle Earth from The Hobbit for the study wall. I had to trim it down more than I would have liked to fit the space, but I think it will look OK. I now need to decide which wallpaper will go best with it for the other two walls - I don't want anything which will compete with the map for attention.


Ordered: (Minimum World) Exterior corner moulding, shrink tubes for electrical work, a second hanging bulb light for the attic, and tan wallpaper for study.


Wednesday 24 December 2014

The Fairfield: Lighting & The Secret Room

I decided it was time to put some more thought into the lighting since I need to put in the channels for the wiring before I do any more wallpapering or flooring. I drilled holes for the lights in the foyer, lounge room, work room and the hallway lights, and started making channels in the floors and walls to feed the wiring into the hollow chimney. It's not very easy I must say - I need to find the small, pointy-ended file I have misplaced, as I think it will do a better job than the Stanley knife I have been using.

Being Christmas Eve, and having almost everything organised (yay me!), I had time to send a lot of the day pottering away on little things for the house.  I wallpapered two of the secret tower room walls - I used this paper, which I think looks suitably old and grubby:


I did some painting too. I undercoated a few pieces and the new front door and round windows, painted the ceilings in the foyer and kitchen - which I totally forgot to do before I glued in the first floor - and the back of the stairs (which I also should have done before I glued it in; live and learn).

I also punched out the pieces for the bay windows ready for prep work, and then I started playing around with the roof around the library area - before the attic floor goes in, I need to decide if and how much of the floor I will cut out to create the double height space.  I was going to add a lot of details to the ceiling, in terms of exposed beams etc, but I forgot that there is a section of roof on the back side too, which will obscure a lot of that work. Hmn.

Monday 22 December 2014

The Fairfield: Foyer Floor Feature

I want to get the floor feature in the foyer done before the tower walls go up, so that it is easy to dry fit and play with it to get the fit right.  I looked at various parquetry patterns and tiles, but decided in the end that I really liked the anti-possession symbol from the TV show Supernatural.


I started by trimming a piece of balsa wood to shape (actually, the piece I had was slightly too narrow, so I has to cut a little extra piece for the back wall, but I hope it won't be too noticeable once it is finished.

I then used a compass to score the circles in the pattern, and then drew the sun and pentagram freehand.  The symbol in the show is made from brass, set into a dark timber floor. To try and replicate this, I scored board marks into the balsa wood, and coloured the symbol in with a gold marker.

Initial symbol
I tried it in place. The piece of balsa wood wasn't wide enough to extend through the doorway, but I think I will place a piece of faux tile here, with more symbols on it, similar to the tiles between the doorways in the Men of Letters bunker on the show.


I then applied the first coat of Walnut stain.  The gold marker was dulled down to a reasonable-looking brass colour which I was happy with.  I did however want the floor to be a darker colour through using black paint washes, so I added another layer of gold marker to the symbol and let it dry before applying the first wash.

After coat of Walnut stain
The colour wasn't deep enough and I didn't think that a black wenge wash would make it dark enough, so I just painted the wenge stain straight over the top and rubbed it off gently after a minute. I love the final colour, it has a nice glow.  I redid the gold marker over the top and then sealed it with Mod Podge.

In real life the gold feature is a more subdued bronze, which is what I wanted. It turned out quite well I think.

Finished floor

Sunday 21 December 2014

The Fairfield: Construction Step 7, More Walls Glued In

Today I glued in kitchen window wall and the remainder of the first floor floor.  It's actually starting to look like a house now.

Stairs, kitchen walls and the rest of the first floor glued in place


Whilst it was all strapped and clamped and drying, I sanded out the first floor doorways and fitted the bedroom and study doors.  They fit perfectly before I glued the other pieces in, but needed a little squaring afterwards. I am pleased with how they look against the wallpaper.


Bedroom door fitted in place

The next step is to work on the tower walls.

A couple of months ago I ordered a new front door, and two round porthole windows for the tower room.  Today I cut out the doorway to fit the new door (it's taller than the old door), and I also cut the spaces for the new round tower room windows. I think they are going to look good - you should certainly have no trouble seeing the Weeping Angel in the secret tower room :-)


Next: I need to sort out the foyer flooring and wallpaper the tower walls - foyer and first floor anyway. I haven't yet decided what I will have on the walls in the tower room. It needs to be something which will show off the Weeping Angel, and if possible I'd like to include some sort of torn-wallpaper homage to the Doctor Who episode 'Blink' which first featured the Weeping Angels.

OR, maybe the damask from Sherlock's apartment:


Saturday 20 December 2014

The Fairfield: Construction Step 6: Stairs & More Walls Glued In Place

After the long delay due to the hibernation of my dollhouse, it's nice to have the stairs finally finished and glued in place. Now I can get on with the rest of the build!


Base of the stairs showing the baseboard on the right hand side.

I knew there would be a small gap to fill in at the bottom of the stairs, but I worked out it was roughly the same size as a newel post when I was doing the dry fit, so I've glued it in place and I think it looks OK, even without a railing. I also stained a small piece of balsa wood cut to shape to frame the lounge room arch and glued it in place - you can just see it running down the edge of the wall in the above pic.

You can also see the small flap I left on the wallpaper where it will join to the tower wall when it is glued in. I won't worry about the others corners so much, but you will be able to see this one from the lounge room, and I don't want there to be any noticeable gaps.


View from the lounge room window


Close up showing the 'wear' I added to the carpet runner


Friday 19 December 2014

The Fairfield: Stairs Finished... Finally!

I'm afraid I've left the doll house languishing for a few months after I had a little disagreement with  the stairs.

I really, really wanted to add baseboards along the sides of the stairs, the problem being however that I had to sand, sand, sand, sand and sand some more to get them to fit into the space - leaving enough room to fit my Braxton Payne oven along the back kitchen wall.

After a final fit of pique I covered it all and left it alone to go crochet a blanket instead!

 Anyway, it is now school holidays, so with extra time up my sleeve, I uncovered everything and had a final surge on the sanding to get it done. I had previously made the base boards for the sides of the stairs out of balsa wood and stained them with the Wenge gel, and then sealed them with Mod Podge.

Now that they fit, I can move on with the build! Hurrah!


Tuesday 16 September 2014

The Fairfield: Mood Board Foyer

I'm not really sure yet what sort of flooring I want in the entry foyer, but I will have to make a start on it before I glue in the tower walls, so I need to start thinking about it now.

I've been looking at pictures of the Men of Letters bunker in the TV show Supernatural.  I particularly like the anti-Demon possession pentacle surrounded by the sun. Sam and Dean have them tattooed on their chests and then it makes an appearance in the floor of the bunker, made from brass.


Brass anti-possession symbol in Men of Letters bunker floor

I also like theses tiles which are placed in the doorways, and contain warding symbols. I might place these underneath the lounge room door archway and between the lounge room and the work room.

Flooring tiles in the Men of Letters bunker


I bought this chandelier last year, which was orginally going to be for the lounge room, but I am debating about putting it in the foyer.  I think the wall light would be more atmospheric - plus you won't be able to see the chandelier very well if it is in the foyer - but I am still drawn to the big light.  I guess I will decide when it gets closer to the actual installation stage.

Chandelier
I've also ordered a new door for the front of the house. This door has a transom and is much taller than the old door, so there will be more light able to shine out (and more the of light fitting to see).

Monday 15 September 2014

The Fairfield: Construction Step 5 First Walls, Glued Together!

Firstly today I painted the ceilings with third coat of Jo Sonja Titanium White, and when it was dry I glued on the ceiling rose. I decided to try making up a central diamond from balsa wood for the ceiling to go around the rose, which I did after looking at a lot of pictures on Pinterest!  I cut it out and applied the first coat of stain.

Then I glued the very first walls together! A momentous occasion, lol.  I glued in central panel, the front right wall, and second floor right and back walls of the main structure.

I then glued together the rear kitchen wall and left hand side of the stairway wall as a separate piece. When it had dried, I applied the black damask wallpaper I am using for the hallway and foyer.  I left a small flap on the wallpaper to glue to the adjoining foyer wall when I put it together, so there won't be any noticeable gaps between the walls.


Sunday 14 September 2014

The Fairfield: More Bits & Bobs

Since I want to glue in the central wall, the chimney and floor section, and the front wall all in one go (so that it all ends up square, in theory), I am trying to decide ahead of time what I can do on these sections that will be easier to do whilst I can lie them flat or manipulate them. Hence, more bits and bobs getting done, instead of actual construction.

I've sealed the wallpaper in the hallway with Mod Podge. It looks far more like actual wallpaper now, not so much like glossy paper, which is great.

I've also painted the windows and French doors and applied a crackle medium glaze. I ended up using Stone Grey paint over the glaze on the surrounds and I don't like it. I should have used a proper grey not a greige! I might sand them back and repaint them once I have completed the siding, depending on how it all looks together.  The siding will be off-white over a black undercoat and crackle glazed.

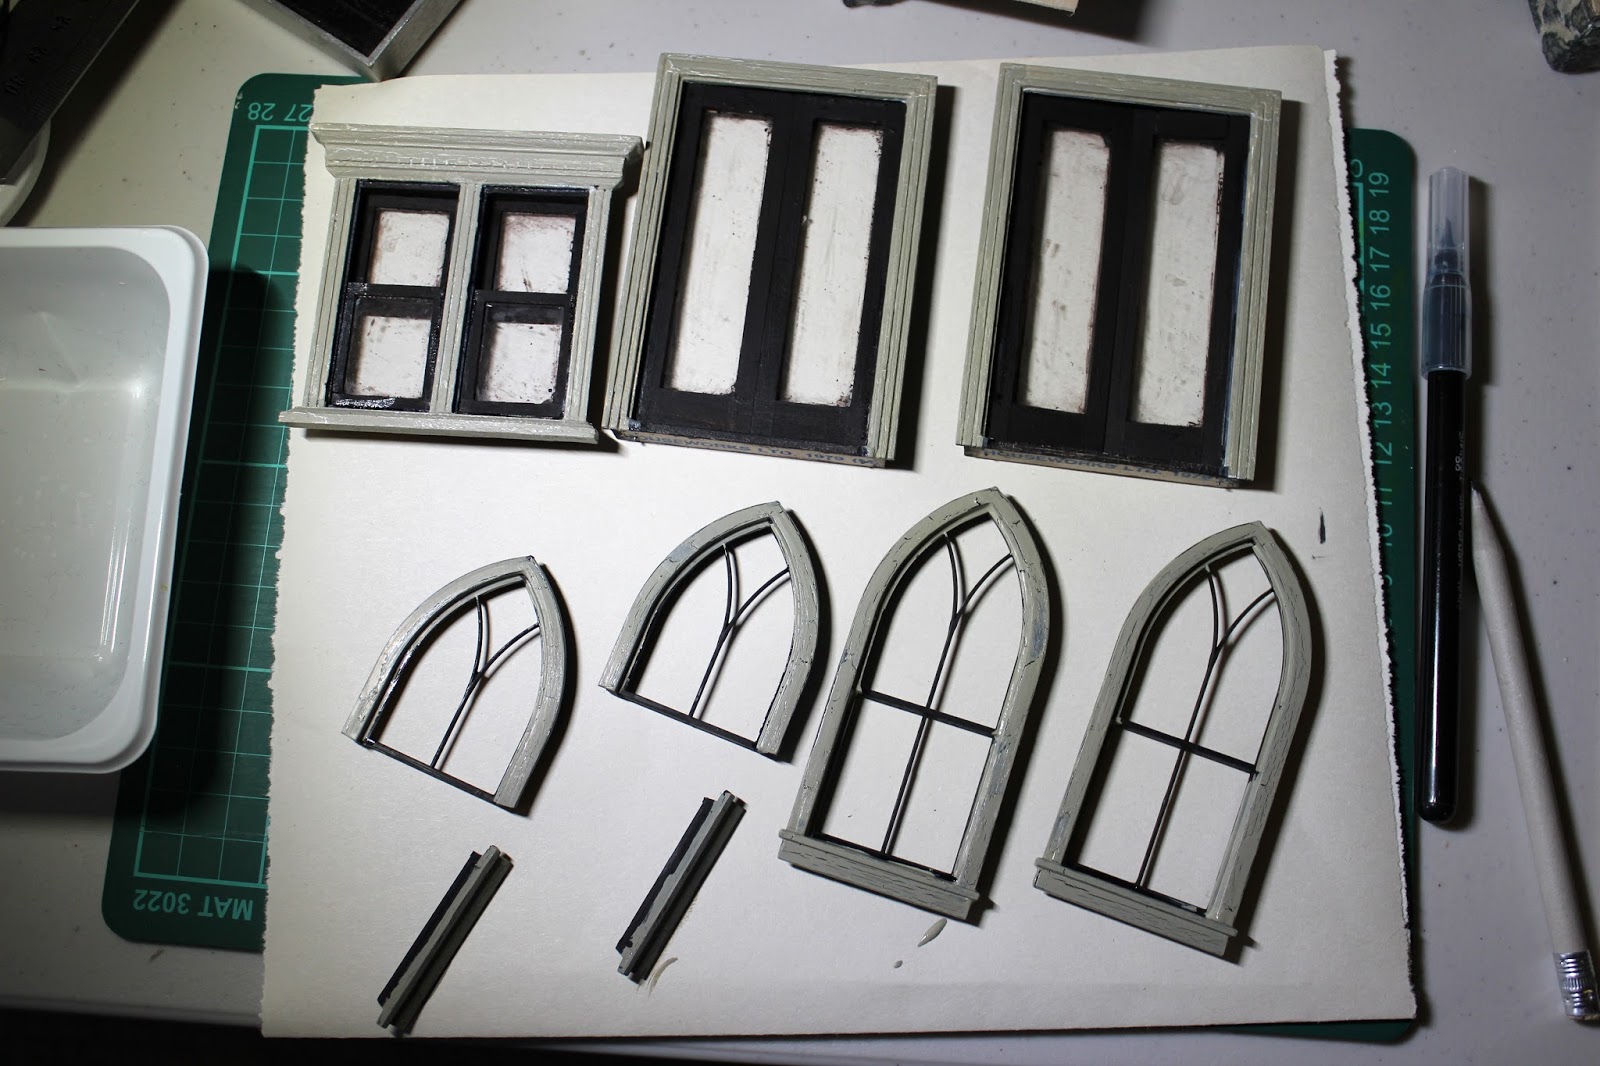
Windows and doors painted, but in a need of a clean!

I was happy with how the crackle glaze came out though, I don't think it's too large for the scale of the house. I was very wary of putting it on too thickly and ending up with giant cracks, but I could have painted on a thicker coat without too much worry. I will make note of that for when I am doing the siding.

I really must clean the acrylic in the windows too, they are filthy!

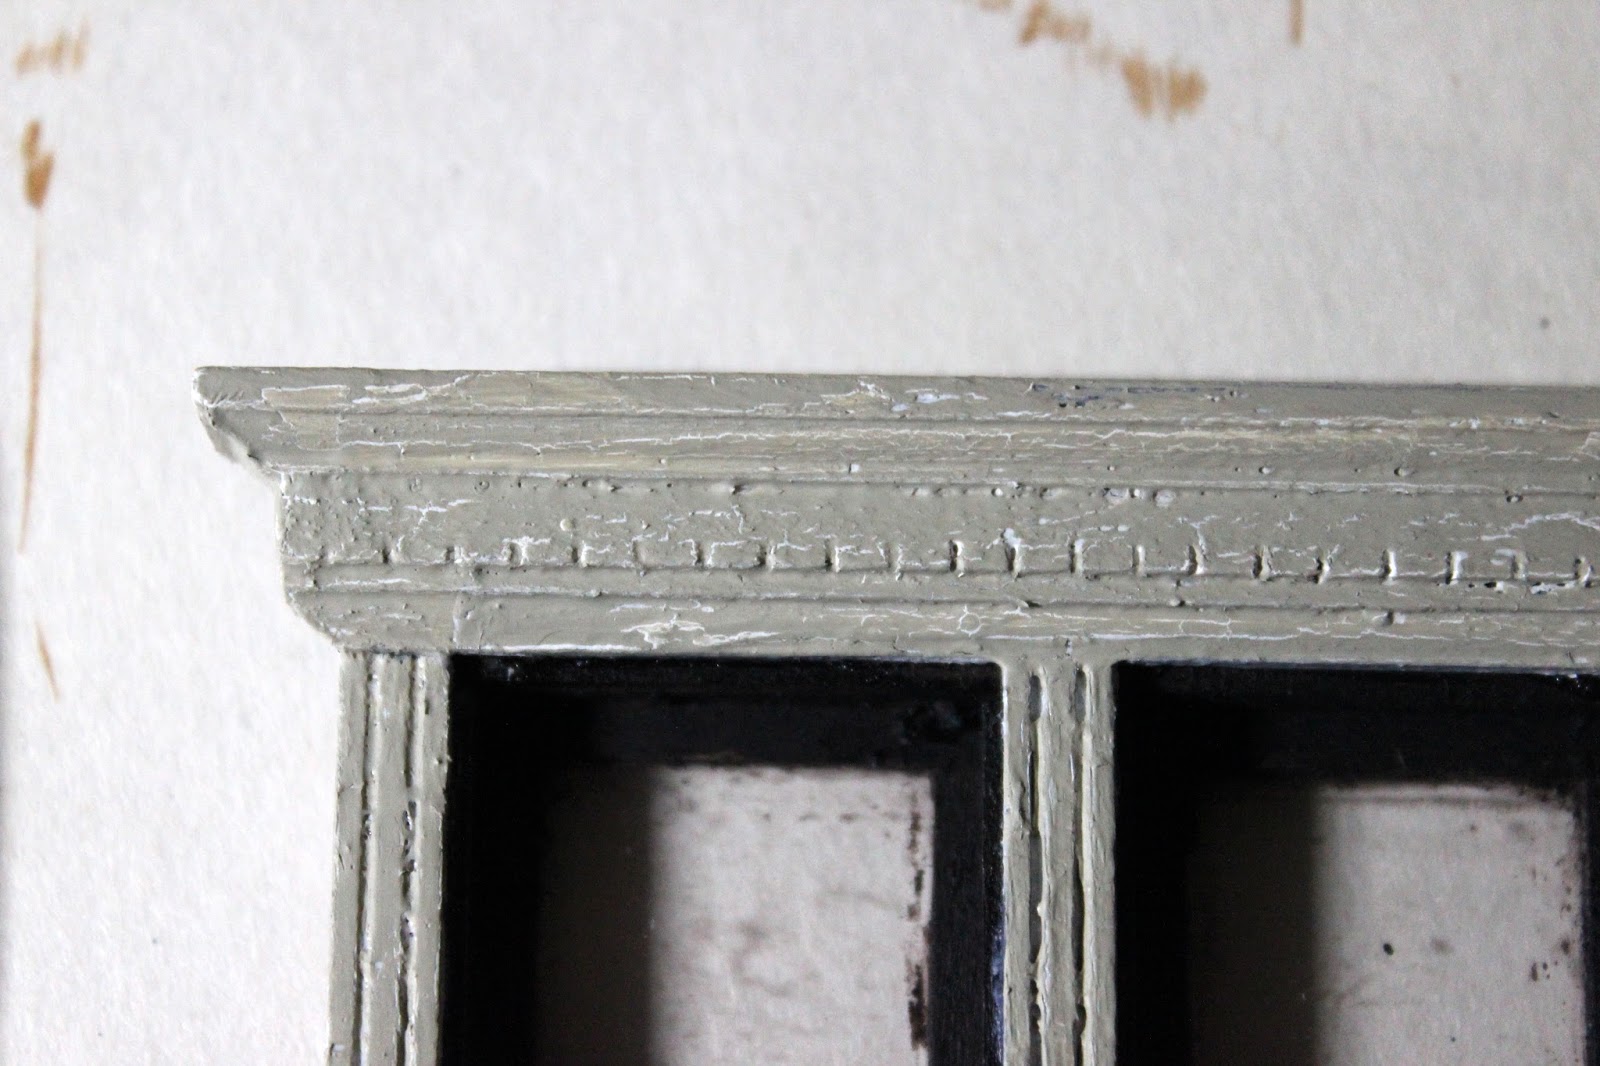
Close up of the crackle glaze on a window after drying


I also finally decided what I wanted to do about the fireplace in the lounge room.  Essentially I can't afford to buy what I really want to put in there, so I had to make do with trying to make something up myself.

I constructed a facade out of bits of balsa wood, based on some photos I found on Pinterest. I'm not able to do any fancy turnings or anything, but I wanted the feel of the room to be fairly masculine anyway, with lots of wood paneling, so I stuck with relatively easy rectangular pieces. I sanded the edges to bevel them, but the wood is so thin that you really can't see it! Oh well. For a rank amateur, with no artistic skills, I think I did OK overall.

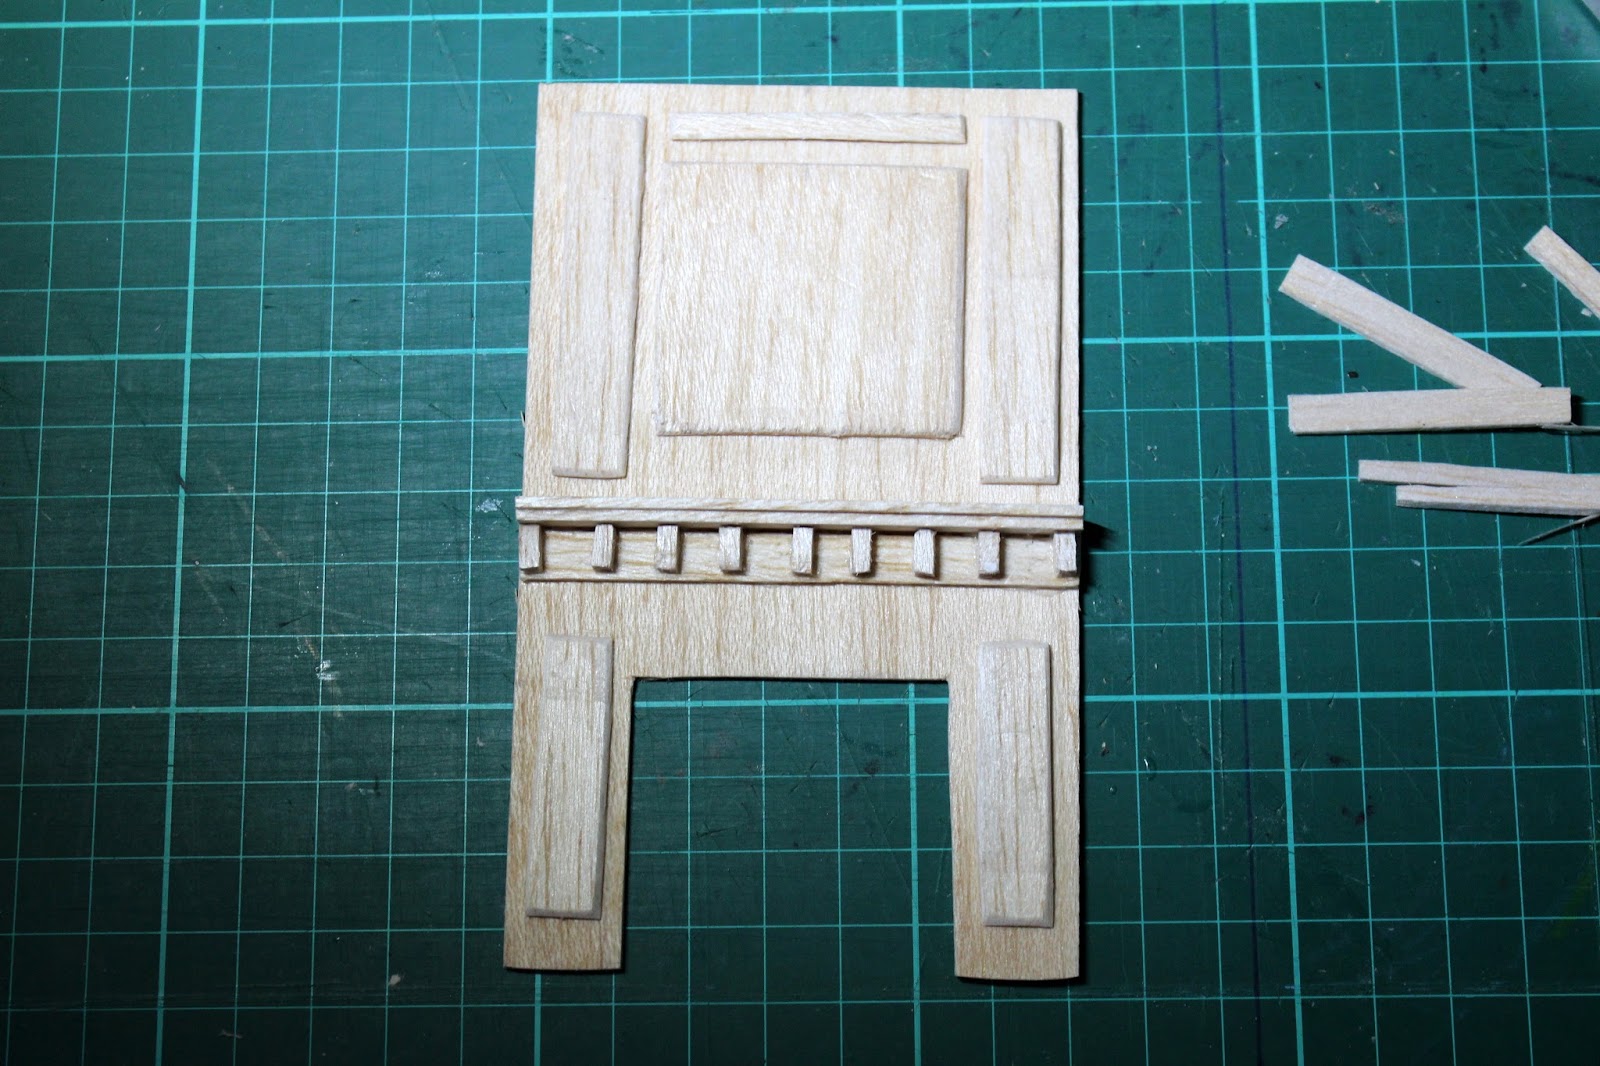
Glued and ready for staining

I then painted it with Walnut stain.  I did a practice run on a scrap piece first and it turned out well, so I was disappointed with the uneveness of the stain on the fireplace :-(  Even after a second coat it remains splotchy. Gluing before staining caused some if the issues, but not all.

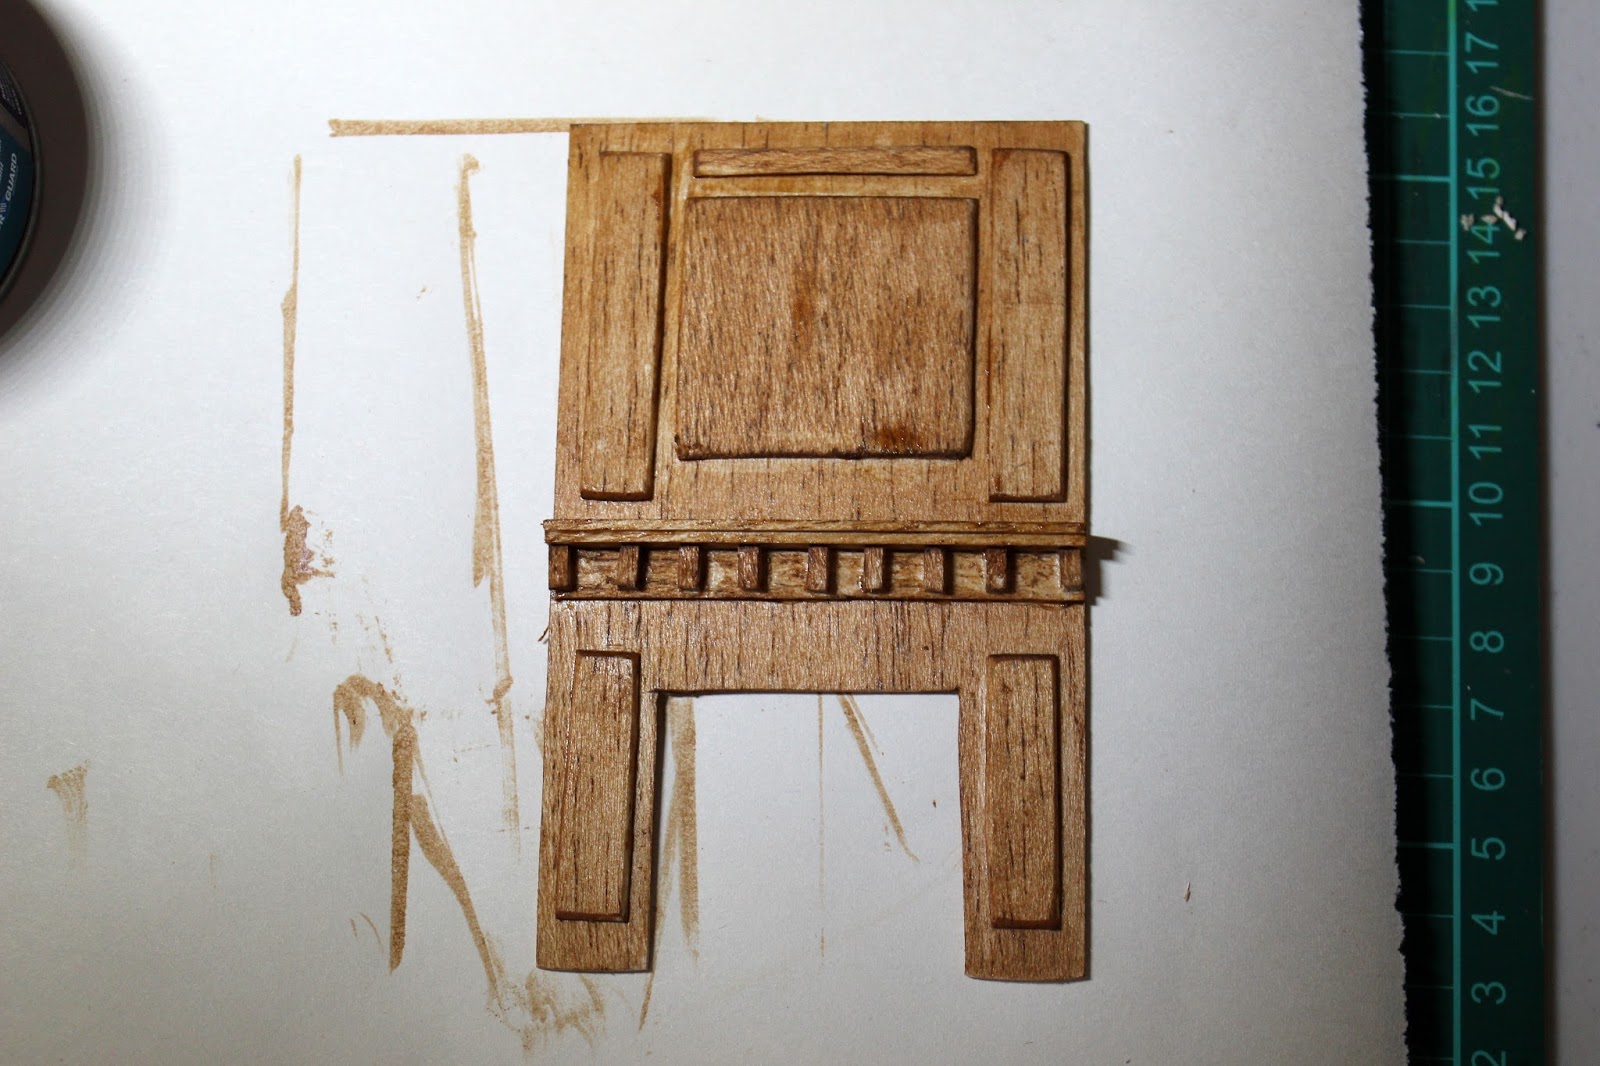
Aftef the first coat of Walnut stain

I may do a final coat of stain with a watered-down Wenge stain to make it darker and therefore appear less uneven. Hmn.  I still need to decide what to do inside the grate - I'd like to lay bricks and paint them, but I'm tempted to just leave it as is and add a tiled hearth when I do the flooring. I'm also debating whether to build in a bookcase on the left hand side of the fireplace wall.  It's an odd space to decorate otherwise.

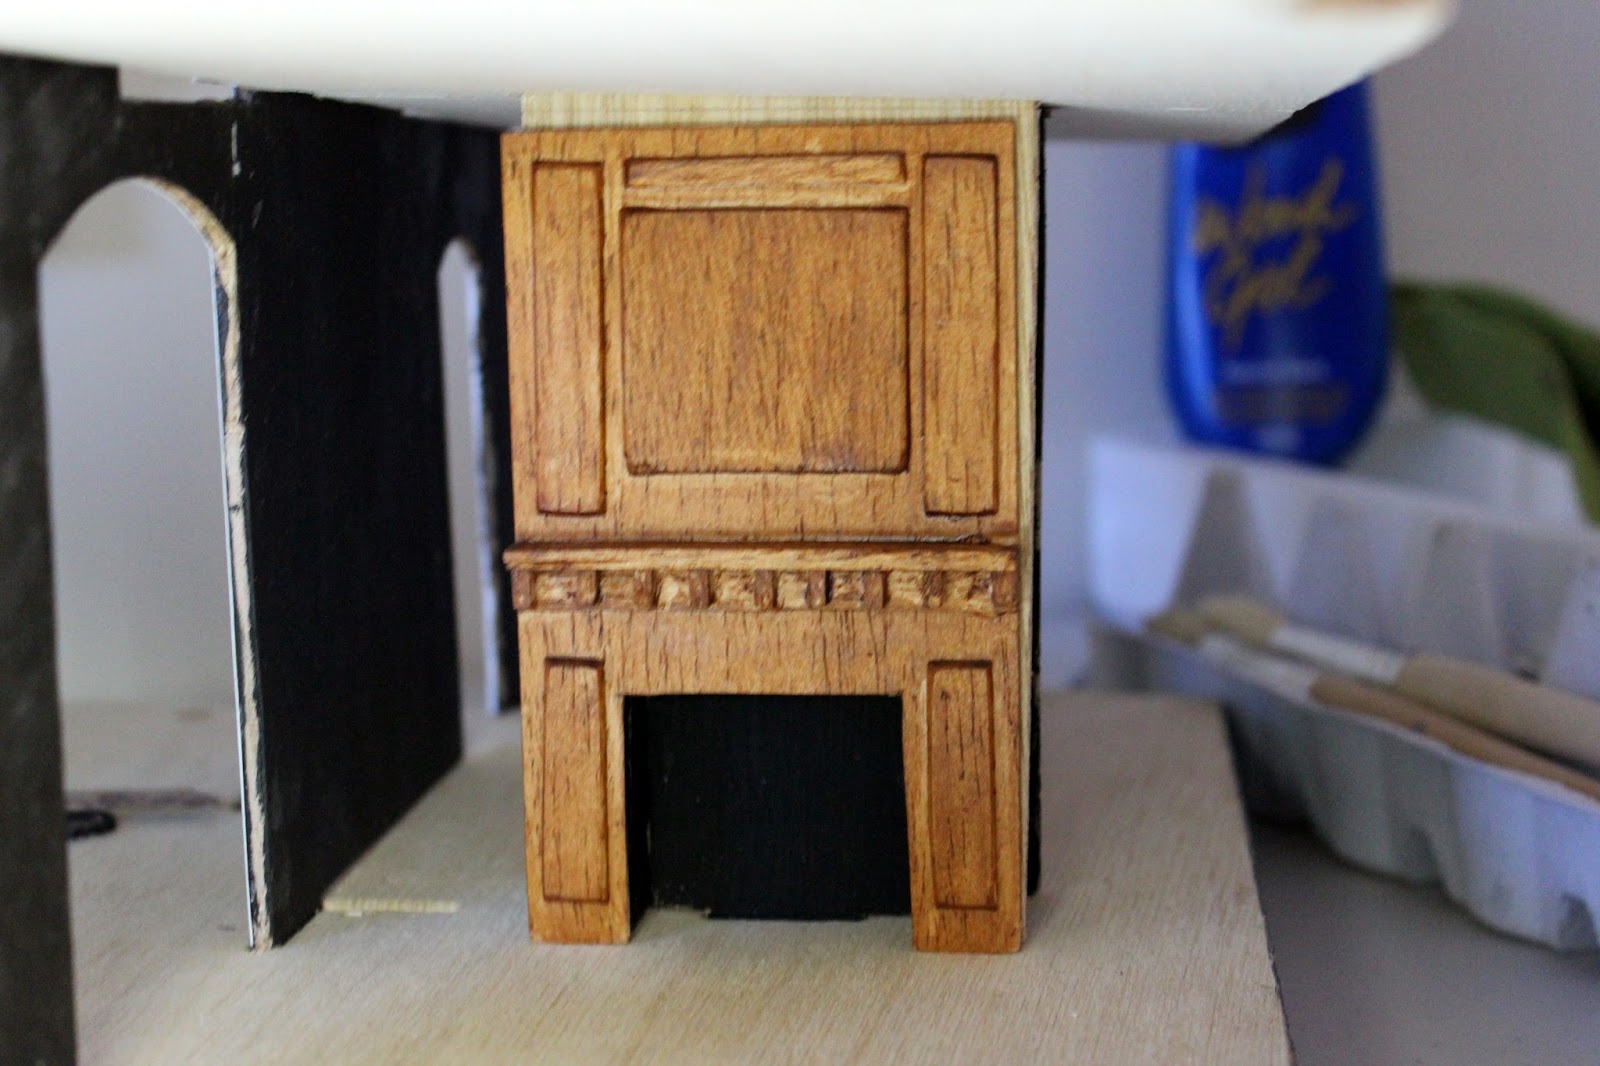
Two coats of stain, and resting in place on the fireplace wall.


Whilst I was playing with the balsa wood, I also started fiddling about with possible treatments for the arched lounge door frame. There is no frame included in the kit for the foyer side of the doorway so I will have to make something up. Given the masculine feel I am going for in the lounge room, I am tempted to square up the arch and add some thick, chunky moulding at the top and sides of the frame instead to link in with the paneling I will add on the walls.

I did most of these things whilst I was undercoating more of the walls and painting the ceilings in the lounge and work rooms, after deciding on the ceiling treatment in the lounge room.  The lounge room ceiling will be white with some sort of feature around the central ceiling rose. Maybe using three-dimensional lace scrap booking stickers?  The work room ceiling will also be white, and I think I will use the white textured ceiling paper in there. I only have one sheet and I was going to use it in the bedroom, but I think the bedroom needs something fancier.

I've also decided on, and ordered, a new front door and two round windows for the tower. I decided on the Grandt Line door, primarily because it is larger than the Houseworks doors, although I'm not too fussed on the door window detail. Meh. And also on the Grandt Line round windows, primarily because they are larger than all the timber ones I could find and I definitely want to be able to see the Weeping Angel I am planning on walling up in the secret room ;-)

They are coming from the US, so they won't arrive for a couple of weeks yet.  In the meantime, I think I am close to gluing my first set of walls in place!

Friday 12 September 2014

The Fairfield: Mood Board Living Room

I've been looking for some inspiration for the living room on Pinterest, and I think I've found the mood I'm looking for: lots of timber, and a heavy, masculine feel with possibly 1920's club chairs and an overstuffed sofa. Lots of books, piled everywhere.

Red Turkish-style rug.

The two photos below have many elements of this theme, I think they're gorgeous!  I can't decide whether to go with the white, embossed ceiling, or the one with the timber beams? Both are great.

Jennifer Connelly's Brownstone. Spectacular.


Fantastic door and ceiling treatments
This is the wallpaper I ordered, but in the 1:24 scale, you can barely see the gold damask pattern unfortunately. Still, I think it will look OK.


Also, this is the ceiling light I think I have settled on for the lounge room - it's not the one I originally bought for the room as I have since done some swapping around, but I think it adds more to the mood I am trying to achieve. I also have a lit fire to go in the grate, although I may end up swapping this out for another room as I'm not sure it's formal enough.


Mmmm. a Chesterfield sofa


Thursday 11 September 2014

The Fairfield: Bits & Bobs

I mostly did little things today, like spackling, sanding and cutting out windows and doors.  Those arched windows are tough as I am cutting with a Stanley knife (since I don't have anything else).  I noticed that the Grandt Line windows are much thinner than the Houseworks windows, so there isn't any gap for the cladding to sit under. Nor are there any mouldings for the inside, so I'm not sure how I will finish them all off? Still, I think they will look nice.

The two Gothic windows in the tower.

French doors, attic windows and a double sash.


I also received a parcel in the mail from A Trifle Small in the UK. The recently offered a small discount of 5% off (it all adds up!), so I ordered a few small things - a couple of book cases, a weather vane kit, some dinosaur eggs and a basket, two tiny potion bottles and a kettle for the stove.

I am still debating about the tower windows, and the front door.  The space for the front door is much larger than the Houseworks door I have, which now seems a bit small. I'd like to replace it with something bigger, but I am already feeling guilty about not using the three Victorian windows I bought and spent time staining and weathering, let alone now not using the front door. Components in Australia aren't cheap and if I buy them overseas I still have to pay postage.  I really think that the tower windows need to be round though, so that they don't over whelm the arched windows below. I also wouldn't mind buying another Gothic window to cut down for the third attic window. Hmn.

Anyway, I will do another dry fit tomorrow, after I prepare the pieces for the bay windows, and see how it is all looking so far.  I think I may trim some of the bottoms off the exterior walls - I did all that work on the foundation stones and it seems such a pity to cover half of them up. I'm not sure why the walls come down so far - perhaps it is to add some stability when gluing them in place.

Wednesday 10 September 2014

The Fairfield: Wallpapering Begins

Despite my apprehension about mucking it up, I held my breath and glued my first piece of wallpaper on!


I need to do the hallway first on the central wall, as I won't be able to access the stairwell once it is in. I wanted to use the black damask but as I said in an earlier post, it came as 1:12 size sheets not 1:24.  I deliberated about using it, but decided to go for it, primarily because I can do the whole section with one sheet so there is no need for patching :-)

I then deliberated and researched about the best paste to use, but in the end I went with my Old Faithful, Mod Podge; a) because I have stacks of it so there is no need for me to buy paste, and b) I am probably going to use it to seal the paper anyway.

So, I applied an even layer of paste and applied the paper to the wall, then weighed it down flat just in case it felt like warping while it dried.  As you can see, I had my first - and probably one of many! - brain fade when I did it, and papered the exterior wall of the house too. Sigh. I peeled it off, but now I will have to sand it back properly before I do the cladding.


My first mistake, but fortunately it isn't a big one!
As you can see, the size of the damask is pretty big, but I think I can get away with it because it's in
the hallways, not a main room. Also, I didn't realise that the wallpaper is quite shiny. I don't like it, it's not in keeping with it being an old house. Maybe when I seal it the matte finish will dull it some. Otherwise, I guess a dirty paint wash would help too.

While I was waiting for the glue to dry, I started on the front wall of the house, which will be the next piece to be glued on.  It needed two new holes cut for the replacement kit windows.  I am really pleased with how the cut-down Gothic window looks in the attic, although I've just noticed looking at the photo, that it is slightly pushed to one side! I must do a little more sanding.


Half window in place, with the hole also cut for the French doors in the bedroom.

The French doors will lead out onto a Juliet balcony on top of the bay window downstairs. I will put a little fancy "iron" rail around it.  Now I have to spackle and sand the door surrounds where those little pieces are about to pop out!

I have also seen a couple of Fairfields made where the builders have removed the whole porch roof from the house to work on the porch as a separate module. I LOVE this idea, it not only helps me with the porch and balcony, but it also means that I will no longer have to slide the tower walls through the gap during construction, so I can wallpaper and paint those sections with more precision.

Anyway, I can't decide whether to wallpaper the reverse side of the wall just yet. If I do, I will likely end up with a visible gap where the walls meet in those rooms, which is pretty ugly. Hmn.

I also had a go a weathering the stair runner, with not much success unfortunately. Once the sealer had dried, I went at it with a wire brush, sandpaper and a metal file to wear away the runner in the middle of the treads.  It sort of worked, but you can't see the effect very well, it just looks like I've made a mess gluing it on! Ah well, you live and learn.

Tuesday 9 September 2014

The Fairfield: Wallpapering

I am contemplating beginning the wallpapering as I build, as areas such as the foyer and staircase walls will be difficult to reach afterwards.  I ordered papers last year, but I haven't enough yet for all the rooms; I haven't got any for the foyer, the kitchen or the 'great' room upstairs (I don't think there is enough of the black damask I am using on the hallway.

These are what I have so far:


Potions room (was dining room)


Library, or possibly Foyer


Hallways upstairs and downstairs.

Living Room

Bedroom
Sent by accident, but I may use it in the Foyer or Library

With the passing of time since I bought these, I'm no longer sure I actually like the first two!  I've no idea either what to put in the kitchen, especially with the stone fireplace in there.  Wallpaper doesn't seem appropriate with a huge stone grate, but I've no idea what alternative treatment to use. Batten and board is wrong too. I had a look at The Blogess' haunted house and she seems to have flagstones and  - what looks like - dirty stucco/ plaster on the walls of her ground floor potion/herbal room. I've seen stucco done on the outside of a house with glue and tissues, which looked pretty straight forward, maybe I could try that?

Also, since I ordered these last year, I forgot that there was a mix up with the order. In my original order I accidentally received four sheets of the last paper instead of the black damask. When she sent me the replacements, she accidentally sent 1:12 size instead of 1:24, but I couldn't be bothered getting it replaced again - primarily because the red version I ordered the damask is very, very faint and barely shows up in 1:24 scale :(   The damask on the 1:12 isn't *too* large so I may end up using it anyway.

Also, as an aside, I noticed that The Blogess hasn't worried about anything as mundane as bathrooms or kitchens either, and I guess as my house is also going to reflect my literary and film/TV loves, then I don't have to either, lol.  I'll leave those for my next project when I'll try to achieve some realism.

The Fairfield: Windows & Electrical Plan

I have yet to pop out any of the pieces of the frame for the windows because I haven't been able to make up my mind about using the Gothic windows. I mulled it over a lot last night whilst I  couldn't sleep, and (I think) I finally made a decision when I realised that I could probably cut the Victorian windows I have in half and use them for the secret room windows. Or I could cut down the Gothic windows too for that matter.  I have always disliked the round windows that come with the kit, but regular windows are all too tall for that room, and you can't buy half size Victorian Houseworks windows in 1:24 scale.  I think if I cut the bottom mantle off, shorten the sides and glue the mantle back on, they will look OK?

So for the moment, my layout looks like this:

Bottom Floor: Three double sash windows.

First floor: Two sets of French Doors, off bedroom and library. Two Gothic windows in tower.

Secret Room: Two cut down Gothic windows.

Attic: Two cut down Victorian windows on the front gable (above bedroom) and the rear gable above the study.  I wasn't going to put a window above the French doors in the library, but I will have one spare to put there if I decide to.

Experimenting with the Gothic windows

I hope I can manage to cut down the windows without butchering them! I'm a bit nervous.

Later:

I cut down one of the Gothic windows and it turned out OK, but the bad news is that it looks odd with the two bigger windows below it.  I will use them on the Attic windows now, but that means I still have to find windows for the secret room, as I think the cut down Victorian windows would also look odd. I may end up ordering two round Grandt Line windows which I didn't want to do. Anyway, I will think more on that when I get to that point.


Also at this point, before I begin wallpapering I need to work out where any electrical wires will go for lamps and light that aren't ceiling mounted.  They are - at this stage - the coach lamp at the front door; the wall-mounted single light in the foyer; the Tiffany lamp in the lounge room, the gas table lamp in the library; the single candle stick on the bedroom mantle; the single candlestick in the potion room;  the wall mounted single light in the upstairs hall; the 2 x double wall mounted lights in the study.

Current Lighting Schedule (subject to change):

Entry: Coach lamp on wall beside door. Run channel on wall inside.
Foyer: Chandelier
Lounge room:  Hanging Double light & flickering grate
Work Room:  Hanging gas lamp & single candle stick on mantle
Kitchen: Single candle stick, flickering coals. Run channels to ceiling.
Bedroom: Tiffany light & Tiffany lamp. Run channel to ceiling.
Study: Wall double lights x 2. Run channels across to chimney.
Library: Chandelier and gas table lamp
Hallway: Single wall lights x 2. Run channels to ceiling.
Attic: Bare bulb (a second one would be nice).

Obviously I am going to have to decide fairly early on where the table lamps and the kitchen candle stick are going to go permanently so I can run the wiring channels, but I'm not really going to be able to do that until I have the furniture for those rooms and have decided where they are going to be located. I can probably run them straight into the floor I guess, and across the ceiling underneath, which wouldn't interfere with wallpapering. Hmn.

Monday 8 September 2014

The Fairfield: Staircase Part 3, Undercoating & Prep

I originally bought white paint to use for undercoating all the walls and floors, but since I want to put dark wallpaper over much of the interior, it seemed odd to use white paint underneath so I have left it until now.

I want to start wall papering the centre wall and foyer soon, so I had to do something, so I mixed up some Black and Burnt Sienna (about 1:2 ratio) into a very dark brown, and used it to undercoat all the interior walls, except the kitchen (which I will probably finish with white stucco), which I painted white.

I can't decide what colour to undercoat the exterior, but it will probably end being black, since I may use crackle glaze and paint white over the top of that, depending on how my trials go.


Undercoating on the central wall panel


I also did another coat of stain on the steps, and when it dried I sanded some areas and took the wire brush to them as well, to make them look a little worn, which will hopefully show through in some areas when I "wear through" the carpet runner.

Stairs, stained and sanded

I couldn't decide whether to use tacky glue or Mod Podge to apply the Jacquard ribbon I an using to replicate a stair runner. In the end I went with Mod Podge, but in hindsight, tacky glue would have been easier, with Mod Podge over the top to seal it.  Because the MP doesn't grab as quickly, the ribbon kept lifting on the tread underneath the one I was working on, when I pushed the ribbon into the crease (I used a paintbrush).

I hope that the sealing doesn't permanently darken the ribbon too much. You can see the end bit I haven't trimmed off yet in the photo and it's a pretty burgundy and gold. I would have darkened it a little to age it, but I don't want it so dark you can't see it!

I'm unsure as to the best way to weather the runner, without destroying the ribbon or making it look (too) amateurish. I am hoping that the MP will seal it enough to allow me to sand it lightly with fine grit sandpaper without it fraying (which would leave large, out-of-scale threads showing).

Stairs with ribbon glued on and drying before trimming and aging

Sunday 7 September 2014

The Fairfield: Staircase Part 2

Ermagherd, the staircase!  I spent hours fiddling and trying to work out the best way to put in a set of stairs that would fit the requirements I had for the space, but sadly my brain functions better than my hands, and the actual building part is beyond my experience.

So, in the end the staircase is going almost where it was originally meant to go, up the middle of the house.  I have modified it slightly in that I've pushed it back further so that the first step is in line with the lounge room doorway, not in front of it.  The hand rail protruding into the doorway annoyed me, plus as an added bonus, I now don't have to fiddle around with one at the bottom at all. I will run a handrail up one of the walls (I'll just glue it to the wall), but I haven't decided right or left yet.

View from the bottom of the stairs

From the lounge room


From the kitchen. I will add a "basement" door here and close in the wall above it.
Moving the stairs forwards means they arrive right at the door of the library/study, but I can live with that

I've trimmed up the wall piece in the kitchen and made a new hole at the top of the stairs, which I will tidy up in the near future.  I'm not totally satisfied with the outcome but I am happy to have finally decided what I am doing here so that I can move on to the next thing.

Now that I am definitely using the kit stairs, I've started staining them, and the rail etc. I have previously bought a red jacquard ribbon which will be used as a stair runner, so I don't need to do a prefect job on the staining.  Once the staining is done, I will glue on the ribbon and then add some wear along the treads, like this:


When I install the stairs, I must remember to add a small strip of basswood along the edges too, like you can see in the photo, just for a bit of authenticity.  I can't decide whether to add stair rails? Since you can't see many of the stairs it's probably not worth the effort.